Backup Amazon RDS Databases with DBSnapper
DBSnapper is a powerful tool for creating and managing backups of your databases. It is designed to be easy to use, and can be installed and configured in minutes. In this tutorial, we'll show you how to use DBSnapper to backup an Amazon RDS database deployed in a private VPC.
Overview
In this tutorial we'll be using the following tools to backup the Amazon RDS database:
- DBSnapper Agent to facilitate the backup process
- DBSnapper Cloud to provide the target configuration and snapshot storage
- Docker to launch a DBSnapper container with the necessary database client tools.
- Amazon EC2 instance to connect to the Amazon RDS database
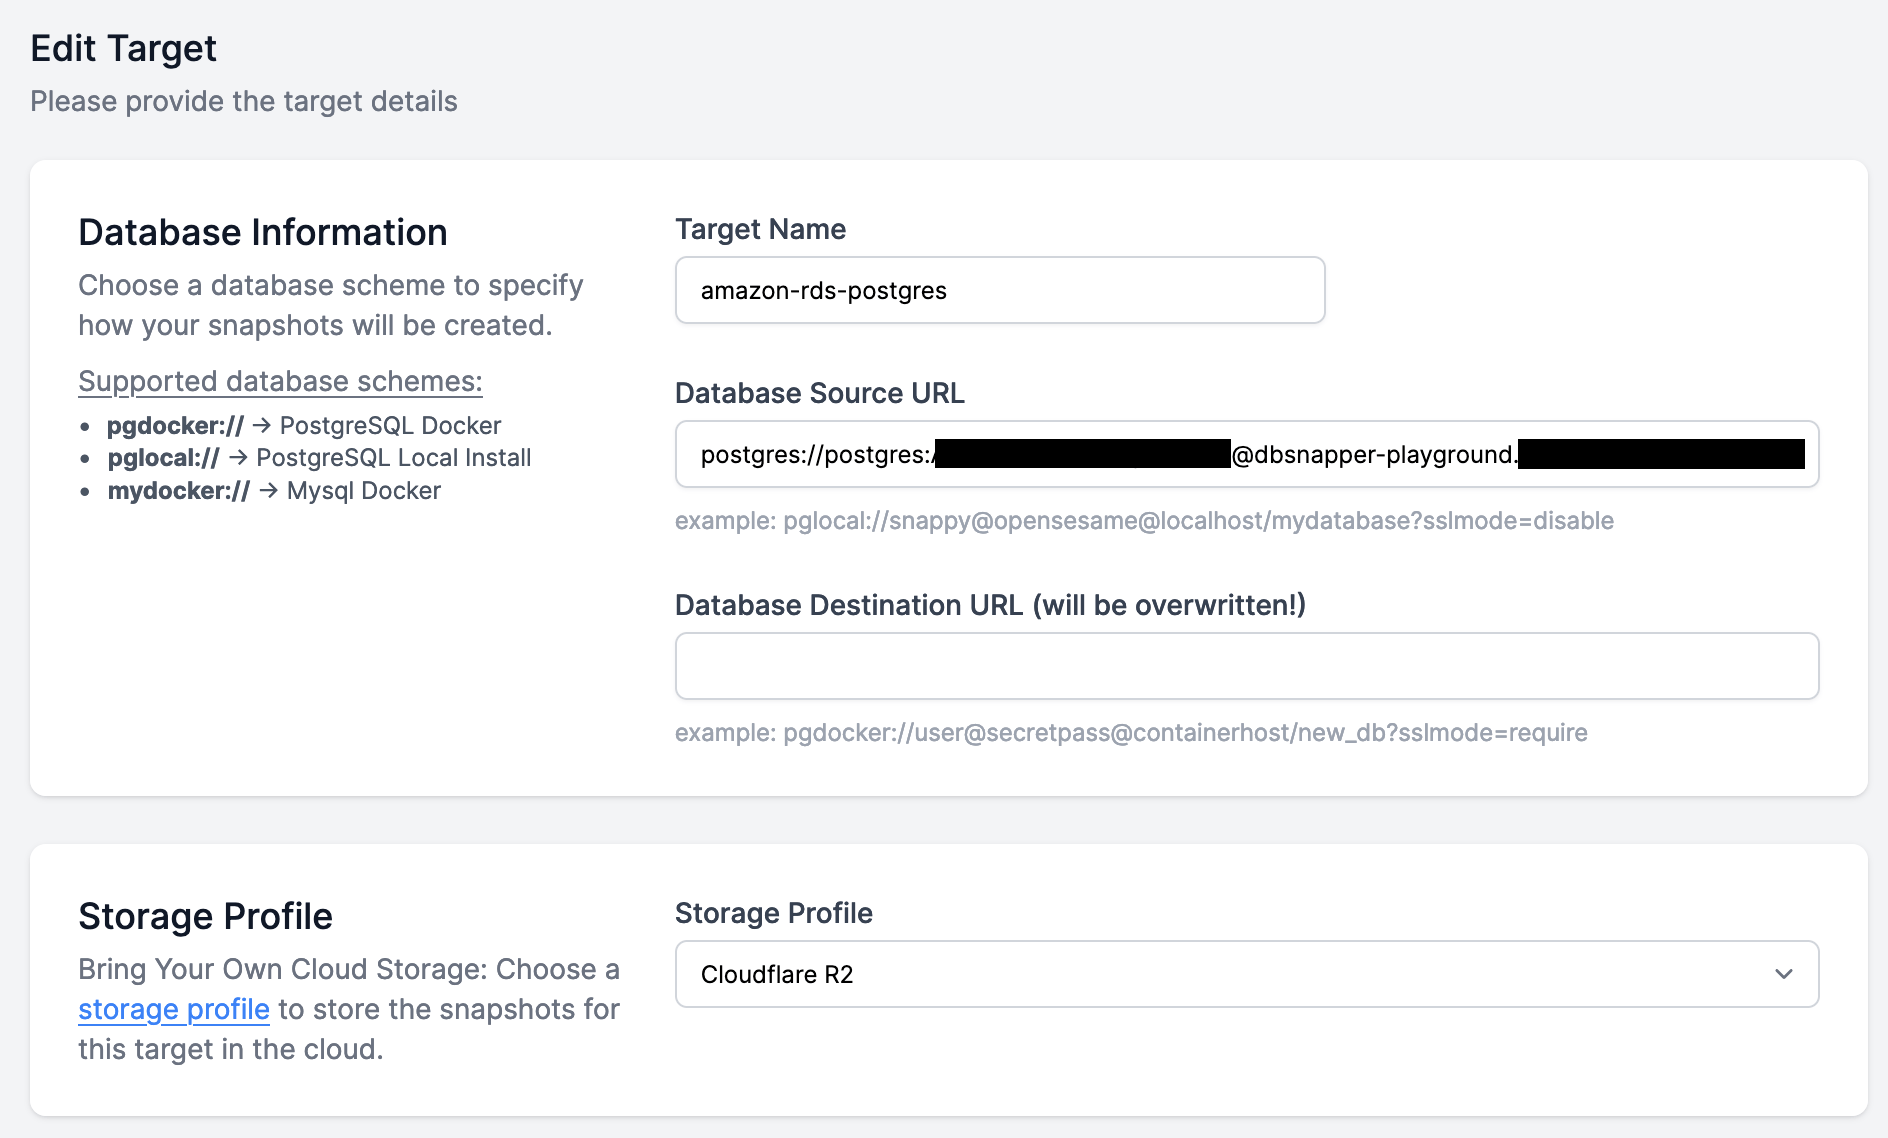
Here's our target definition on the DBSnapper Cloud. We've simply provided the connection string of the Amazon RDS database as the source URL, and a Cloudflare R2 storage profile as the destination URL.
TL;DR Backup in Four Commands
Update: You can now do this in a SINGLE command
(copied from the DBSnapper Quick Start Guide)
Just use the latest version of the DBSnapper container image, provide the minimum required DBSNAPPER_SECRET_KEY and DBSNAPPER_AUTHTOKEN environment variables necessary to run DBSnapper in Cloud mode, without a configuration file.
docker run -v /var/run/docker.sock:/var/run/docker.sock -e DBSNAPPER_SECRET_KEY=XXX -e DBSNAPPER_AUTHTOKEN=YYY --rm --network dbsnapper --pull always ghcr.io/dbsnapper/dbsnapper:latest dbsnapper build dvdrental-cloud
This command does the following:
- It pulls the latest version of the DBSnapper Agent container image from the GitHub Container Registry,
- It mounts the host Docker socket. This is optional, but necessary for ephemeral sanitization operations requiring Docker-in-Docker (DinD) support.
- Passes the
DBSNAPPER_SECRET_KEY and DBSNAPPER_AUTHTOKEN environment variables to the container
- Runs the
dbsnapper build dvdrental-cloud command to build a snapshot of the dvdrental-cloud target defined in the DBSnapper Cloud.
- If a storage profile is defined in the DBSnapper Cloud, the snapshot will be uploaded to the configured storage provider.
| Amazon RDS Backup in four commands |
|---|
| # Launch interactive DBSnapper Container from EC2 instance
docker run -it ghcr.io/dbsnapper/dbsnapper:latest /bin/bash
# Create our configuration and connect to the DBSnapper Cloud
dbsnapper config init
dbsnapper auth token <YOUR_DBSNAPPER_CLOUD_AUTH_TOKEN>
# Build the snapshot and upload to object storage
dbsnapper build amazon-rds-postgres
|
Launch an EC2 Instance
To easily gain access to the Amazon RDS database, we'll launch an EC2 instance in the same VPC as the RDS database. This will allow us to run DBSnapper and connect to the RDS database without exposing the database to the public internet.
For this instance I am using the Canonical, Ubuntu, 22.04 LTS, arm64 (ami-05d47d29a4c2d19e1) image. But you can use other Linux distributions as well.
Launch an Interactive DBSnapper Container
The DBSnapper Docker Images include the necessary database client tools for PostgreSQL and MySQL, so it is a quick way to get started with all the necessary dependencies.
| Launch DBSnapper Container & Setup DBSnapper Agent |
|---|
| # Launch interactive DBSnapper Container
docker run -it ghcr.io/dbsnapper/dbsnapper:latest /bin/bash
# Create our configuration and connect to the DBSnapper Cloud
dbsnapper config init
dbsnapper auth token <YOUR_DBSNAPPER_CLOUD_AUTH_TOKEN>
dbsnapper targets
|
Using the commands above, we will launch an interactive DBSnapper container, initialize the DBSnapper configuration file, and authenticate with the DBSnapper Cloud using the authentication token provided on the Get Started page, and finally list the available targets.
| Command output |
|---|
| 1c09173ca85b:~# dbsnapper config init
DBSnapper Agent - Version: 2.0.0 (60302b36df4d08b7c0a983c435d683e67373b235) Build Date: 2024-02-22T00:13:23Z
DBSnapper Cloud: Standalone Mode
Initializing dbsnapper config at : /root/.config/dbsnapper/dbsnapper.yml
Creating dbsnapper working directory at: /root/.dbsnapper
1c09173ca85b:~# dbsnapper auth token <YOUR_DBSNAPPER_CLOUD_AUTH_TOKEN>
DBSnapper Agent - Version: 2.0.0 (60302b36df4d08b7c0a983c435d683e67373b235) Build Date: 2024-02-22T00:13:23Z
DBSnapper Cloud: Standalone Mode
Cloud API token written to configuration file: /root/.config/dbsnapper/dbsnapper.yml
1c09173ca85b:~# dbsnapper targets
DBSnapper Agent - Version: 2.0.0 (60302b36df4d08b7c0a983c435d683e67373b235) Build Date: 2024-02-22T00:13:23Z
DBSnapper Cloud: Enabled
Listing all targets
+---------------------+----------+--------+------------------------------------------------------+------+-----+-----------------+-------+----------+
| NAME | LOCATION | STATUS | SRC | SIZE | DST | STORAGE PROFILE | QUERY | MESSAGES |
+---------------------+----------+--------+------------------------------------------------------+------+-----+-----------------+-------+----------+
| amazon-rds-postgres | cloud | | pgl://dbsna...amazonaws.com:5432/rds_backup_tutorial | 0 B | | Cloudflare R2 | No | |
+---------------------+----------+--------+------------------------------------------------------+------+-----+-----------------+-------+----------+
|
With three simple DBSnapper commands (highlighted) we've initialized the configuration file, authenticated with the DBSnapper Cloud, and listed the available targets. We see our Amazon RDS database listed as the amazon-rds-postgres target.
Backup the Amazon RDS Database
Build the Snapshot
Now that we have the DBSnapper container running and have authenticated with the DBSnapper Cloud, we can simply use the build command to create a snapshot of the Amazon RDS database.
| Backup Amazon RDS Database |
|---|
| dbsnapper build amazon-rds-postgres
|
| Command Output |
|---|
| 1c09173ca85b:~# dbsnapper build amazon-rds-postgres
DBSnapper Agent - Version: 2.0.0 (60302b36df4d08b7c0a983c435d683e67373b235) Build Date: 2024-02-22T00:13:23Z
DBSnapper Cloud: Enabled
START: Build Snapshot for target: amazon-rds-postgres with engine: postgres-local
--> Cloud target, Cloud storage, non-localhost DB.
--> Zipping snapshot 1708621936_amazon-rds-postgres to /root/.dbsnapper/1708621936_amazon-rds-postgres.zip
--> Uploading snapshot to Cloud Storage Profile: Cloudflare R2 - r2://dbsnapper-r2/dbsnapper-playground/cc6e21cb-e591-4a0e-8166-eba3c2a98dca.zip
--> Upload complete.
--> Local snapshot entry stored in cloud, ID: cc6e21cb-e591-4a0e-8166-eba3c2a98dca
FINISH: Building DB Snapshot for target: amazon-rds-postgres
|
And there you have it. We've backed up the Amazon RDS database and it is now available in your cloud storage and can be retrieved and loaded by the DBSnapper Agent on any machine with access to the your DBSnapper Cloud account.
List the Snapshot
We can verify that the snapshot was created by listing the snapshots for the target.
| List Snapshots for the Target |
|---|
| 1c09173ca85b:~# dbsnapper target amazon-rds-postgres
DBSnapper Agent - Version: 2.0.0 (60302b36df4d08b7c0a983c435d683e67373b235) Build Date: 2024-02-22T00:13:23Z
DBSnapper Cloud: Enabled
Tables in target: amazon-rds-postgres
+---------------+------------+--------+
| NAME | EST'D ROWS | SIZE |
+---------------+------------+--------+
| address | 603 | 131 kB |
| users | 4 | 49 kB |
| store | 2 | 41 kB |
| staff | 2 | 33 kB |
| payment | 14,596 | 1.9 MB |
| film | 1,000 | 934 kB |
| inventory | 4,581 | 451 kB |
| film_category | 1,000 | 90 kB |
| language | 6 | 25 kB |
| country | 109 | 25 kB |
| film_actor | 5,462 | 500 kB |
| customer | 599 | 188 kB |
| city | 600 | 90 kB |
| actor | 200 | 49 kB |
| category | 16 | 25 kB |
| rental | 16,044 | 2.4 MB |
+---------------+------------+--------+
Listing ALL snapshots for target: amazon-rds-postgres
+-------+-------------------------+--------------------------------+------------------------------------------+--------+------------+-------+
| INDEX | CREATED | NAME | FILENAME | SIZE | SANITIZED? | SANFN |
+-------+-------------------------+--------------------------------+------------------------------------------+--------+------------+-------+
| 0 | 2024-Feb-22 @ 17:12:17Z | 1708621936_amazon-rds-postgres | cc6e21cb-e591-4a0e-8166-eba3c2a98dca.zip | 613 kB | false | |
+-------+-------------------------+--------------------------------+------------------------------------------+--------+------------+-------+
|
Optional: Test EC2 <-> RDS Connection
To ensure we're able to connect to the Amazon RDS database from our EC2 Instance, we can use the psql command to connect to the database and list the available tables.
| Connect to Amazon RDS Database |
|---|
| psql -d postgres://postgres:<PASSWORD>dbsnapper-playground.<RDS_HOSTNAME...>:5432/rds_backup_tutorial
psql (16.2, server 16.1)
SSL connection (protocol: TLSv1.3, cipher: TLS_AES_256_GCM_SHA384, compression: off)
Type "help" for help.
rds_backup_tutorial=> \dt
List of relations
Schema | Name | Type | Owner
--------+---------------+-------+----------
public | actor | table | postgres
public | address | table | postgres
public | category | table | postgres
public | city | table | postgres
public | country | table | postgres
public | customer | table | postgres
public | film | table | postgres
public | film_actor | table | postgres
public | film_category | table | postgres
public | inventory | table | postgres
public | language | table | postgres
public | payment | table | postgres
public | rental | table | postgres
public | staff | table | postgres
public | store | table | postgres
public | users | table | postgres
(16 rows)
rds_backup_tutorial=>
|
We're using Docker for this tutorial so if your instance doesn't have it installed, the following commands will install and setup Docker community edition in rootless mode on your instance.
| Install Docker Community Edition on Ubuntu 22.04 LTS |
|---|
| curl -fsSL https://get.docker.com -o get-docker.sh && \
sudo sh ./get-docker.sh
sudo sh -eux <<EOF
# Install newuidmap & newgidmap binaries
apt-get install -y uidmap
EOF
dockerd-rootless-setuptool.sh install
|